Categories
The Power of PSEvent

PSEvent Targeted Logout

A while back, I did a presentation for the Appsian Innovation Summit Winter 2021 called The Power Behind the PeopleSoft Push Notification Framework.

It showed you how I had used the PSEvent object with my own PeopleSoft Broadcasting Component to broadcast messages to users, send a message to users with a timer countdown, find out what users are on the system at this moment in time, query information about what a specific user is up to at this moment or, as we are going to discuss today, the targeted logout of a specific user from PeopleSoft PIA.

So lets take a look at the PSEvent class and what it can do. It is an abstraction of Websocket, this means that PeopleSoft makes it really simple for us to use Websockets. So what is a Websocket and what makes it so great?

Websockets are a communication protocol just like Http or AJAX. With Http you have a request response model where the client opens a connection, sends out a synchronous request, say a web address and the response is sent from the server such as an HTML page and that is the end of the connection, the server no longer knows anything about the client.

With websockets you establish a trusted connection between the client (web browser) and webserver and that connection persists until closed. Because websockets are a persistent connection it means that the communication is a lot quicker than HTTP, because every time you want to send a HTTP request you have to set up a connection and send the communication headers.

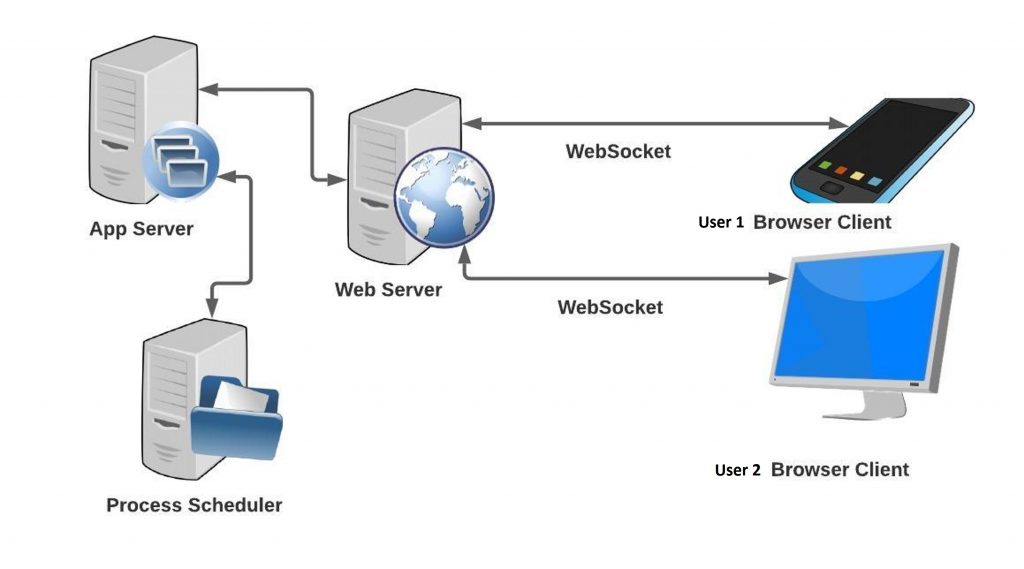
So when a user signs in to PeopleSoft PIA a Websocket connection is setup between that user’s browser and the webserver. This connection is what we are going to exploit, because we can travel along these connections from the webserver to a specific user.

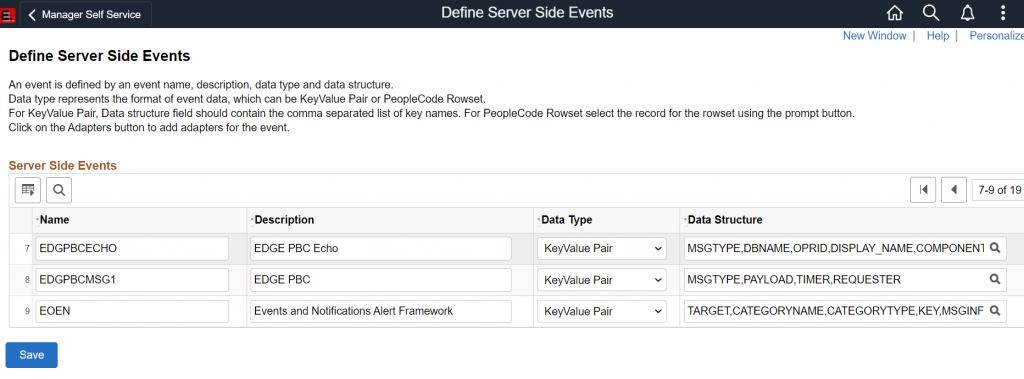
So to access these connections we need to create an event by navigating to PeopleTools > Push Notifications > Define Server Events. Think of the event object as similar to an Integration Broker message, it’s an object that can carry whatever data you define. You can define the content of an event as either rowset data or keyvalue pairs. I personally prefer keyvalue pairs as this is the form JSON uses, which is a lot more universal especially when you will be subscribing to these events with JavaScript, which knows nothing of a PeopleSoft Rowset.

I have created EDGPBCMSG1 (Edge PeopleSoft Broadcasting Component Message 1!) and it has 4 keyvalue pairs.

1 – MSGTYPE will indicate the type of message, so that I can use the same event but send different messages. In my full presentation this message sent the broadcast event, timer event, user count, check user and logout event all from the one PSEvent definition.

2 – PAYLOAD is a generic field for holding whatever data might need to be transferred to the target. In the logout it does not need a value, we simply want to logout the user receiving the event.

3 – TIMER is another field not used by the logout event type, it is used when sending a timer message (another example from the presentation).

4 – REQUESTER passes the Userid of the person triggering the event.

So now we need to write some peoplecode to publish our event. That is really straight forward. I put some code on a button field change.


Local object &EventObject;

&EventObject = CreateObject("PSEvent");

   First up we need to initialise our PSEvent, we do this by declaring a variable of type ‘object’ and then instantiating that with the CreateObject function into an object of type ‘PSEvent’.

Evaluate GetLevel0()(1).EDG_PBC_WRK.EDG_PBC_MSGTYPE.Value
When = "OUT"
   &EventObject.SetKeyValuePair("MSGTYPE", GetLevel0()(1).EDG_PBC_WRK.EDG_PBC_MSGTYPE.Value);
   &EventObject.SetKeyValuePair("PAYLOAD", "");
   &EventObject.SetKeyValuePair("TIMER", 0);
   &EventObject.SetKeyValuePair("REQUESTER", %OperatorId);
   &EventObject.AddRecipient(GetLevel0()(1).EDG_PBC_WRK.OPRID.Value, 1);
   Break;

The code above is then responsible for populating my PSEvent object that I have created. You may notice that even at this point when we are adding data to the PSEvent object, we have not said which of our defined PSEvents we are using, therefore the PSEvent object does not know what data to expect, so we could actually add all sorts of data to the object, it is only upon the publish that we confirm with PSEvent message we wish to use. So bear this in mind that it is up to you to ensure that you add the correct data required by your PSEvent. The code here has a field ‘EDG_PBC_MSGTYPE which is a dropdown on the page which I select to choose which message to send. In the evaluate statement you can see that a MSGTYPE of ‘OUT’ is what I use to identify my logout event trigger. The next 4 line use the ‘SetKeyValuePair’ method to add the data to the PSEvent, with the parameters simply being ‘Key’ and ‘Value’ (example key = ‘REQUESTOR’, value = ‘%OperatorId’). The final method call is the AddRecipient method which tells PeopleSoft who I want to sent the message to. It takes 2 parameters, the target and then a mode. The mode of 1 means send it to a user, whereas a value of 2 means send it to all users with a given role, while setting no recipients means that everyone gets the event!

So you can see by using this method we could logout every user in the system or certain groups using the roles or just single people as in my example. There is a sister method of AddRecipients which works exactly the same, except it allows you to specifiy multiple users or multiple roles to make this even more flexible.

&EventObject.Publish("EDGPBCMSG1");

Finally after creating our PSEvent object, populating it with data we just need to send the event to anyone listening. This is done by invoking the Publish() method of the PSEvent object and in the parameters we pass the name of the evnt that we want to send. As you can see in the code above, we are publishing our EDGPBCMSG1 that we defined on the Server Events page at the start. And that is a simple as it gets for publishing a PSEvent. Next we need to take on the subscription.

For the subscription we are going to use JavaScript rather than PeopleCode as we want the code to exist wherever the user might be in PeopleSoft. So we will put the JavaScript code in an HTML object and to ensure that the subscription code is fired I took a little hint from Sasank Vemana that he showed in one of his blogs and I added the following include statement to the bottom of the delivered PT_UTIL HTML object.

/* EDG_PBC BEGIN by R.Swailes Custom Javascript */
%include(EDG_PBC_EVT_SUBSCRIBE);

/* EDG_PBC END */

Next up we need the code that is going to go in that custom HTML object EDG_PBC_EVT_SUBSCRIBE. This will be the code that subscribes to our PSEvent and then carries out the logout command.

Subscribe("EDGPBCMSG1", OnPBCEvent);

And here is the JavaScript function Subscribe creates a listener for any PSEvents of a given type. The first parameter of the function is the PSEvent type, here you can see the name of the Server Event we defined at the start ‘EDGPBCMSG1’. The second parameter is a callback function name, what this means is you put the name of a JavaScript function that will be triggered when the specified PSEvent is sent to you. My function is called ‘OnPBCEvent’, so lets look at that JavaScript function now.

function OnPBCEvent(EventName, EventData) {
    if (EventName == "EDGPBCMSG1") {
        var mainUrl;
        var parts;
        var logoutURL;
        var xhr;
  

The first part of the function declaration, you can see that the callback function is passed two parameters, EventName which is the name of the PSEvent sent (in our case we expect this to be EDGPBCMSG1. The second parameter EventData carries the data be it rowset or in our case KeyValue pairs that we added to the PSEvent when sending it. The first thing we do is check that we have recieved the correct PSEvent by seeing if EventName = “EDGPBCMSG1”. Then we set some variables to be used later.

      var sMsgType = decodeURIComponent(EventData.Map["MSGTYPE"]);
        var sPayload = decodeURIComponent(EventData.Map["PAYLOAD"]);
        var iTimer = decodeURIComponent(EventData.Map["TIMER"]);
        var sRequester = decodeURIComponent(EventData.Map["REQUESTER"]);

Now we know we have the correct PSEvent, we are going to extract all the data send on that event. If you can remember back to the start we set our PSEvent object as having 4 data keyvalue pairs: MSGTYPE, PAYLOAD, TIMER and REQUESTER. We use the JavaScript function decodeURIComponent to ensure that any special characters that may have been encoded are decoded. EventData was the parameter holding all the PSEvent data so we use the javaScript method Map which stores the value of the keyvalue pair into a variable.


        /* Process each message type differently */
        switch (sMsgType) {
            case 'OUT':
                // User logout
                mainUrl = window.location.href;	
	        parts = mainUrl.match(/ps[pc]\/(.+?)(?:_\d)*?\/(.+?)\/(.+?)\/[chswq]\//);	
	  

We have a switch statement which is the same as an evaluate in PeopleCode. This is because my PSEvent can be used to trigger different code depending on the type. In this case if the MSGTYPE is set to ‘OUT’ then we are going to do the logout code. Next we get the url from the browser and then break this into parts, you will find this code used in many places in PeopleSoft it is the JavaScript way of doing a GenerateComponentPortalUrl.

      var logoutURL = window.location.origin + "/psc/" + parts[1] + "/" + parts[2] + "/" + parts[3] +"/s/WEBLIB_EDGPBC.ISCRIPT1.FieldFormula.IScript_edgTargetedLogout";

Now we use those parts of the browser url to create an iScript url. Although technically you can do a logout just by redirecting to a hardcoded url. I like to go to the IScript to retrieve my logout url. Here you can see I am calling the IScript_edgTargetedLogout. We will look at that IScript once we finish this JavaScript function.

       // fetch the iscript Url, use write to send a response, get response object text  and that should be the logout url
                fetch(logoutURL)
                  .then(response => response.text())
                  .then(data => { window.top.location = data;});


                break; 
         
        };
    };
};

Finally we use the generated logoutUrl to call the Iscript. We use the brilliant JavaScript fetch command. For more information on the fetch command see my EIS 2021 presentation The Power and Flexibility of JavaScript – The Understated PeopleTool. What we need to know is that the fetch call will cause the IScript to execute and we should get returned from that a response containing the logout url which will be in the variable data, which we then assign to the browser location, thus forcing the logout. So the full JavaScript for the HTML object EDG_PBC_EVT_SUBSCRIBE is below

function OnPBCEvent(EventName, EventData) {
    if (EventName == "EDGPBCMSG1") {
        var mainUrl;
        var parts;
        var logoutURL;
        var xhr;
        var sMsgType = decodeURIComponent(EventData.Map["MSGTYPE"]);
        var sPayload = decodeURIComponent(EventData.Map["PAYLOAD"]);
        var iTimer = decodeURIComponent(EventData.Map["TIMER"]);
        var sRequester = decodeURIComponent(EventData.Map["REQUESTER"]);
        /* Process each message type differently */
        switch (sMsgType) {
            case 'OUT':
                // User logout
                mainUrl = window.location.href;	
	        parts = mainUrl.match(/ps[pc]\/(.+?)(?:_\d)*?\/(.+?)\/(.+?)\/[chswq]\//);	
	        var logoutURL = window.location.origin + "/psc/" + parts[1] + "/" + parts[2] + "/" + parts[3] +"/s/WEBLIB_EDGPBC.ISCRIPT1.FieldFormula.IScript_edgTargetedLogout";
              
                // fetch the iscript Url, use write to send a response, get response object text  and that should be the logout url
                fetch(logoutURL)
                  .then(response => response.text())
                  .then(data => { window.top.location = data;});

                break; 
         
        };
    };
};

Subscribe("EDGPBCMSG1", OnPBCEvent);

So now lets take a look at the IScript that is being called and how it generates the logout url needed.

Function IScript_edgTargetedLogout
   /* Log out user */
   Local EDG_UTILITIES:EDG_User_Utilities &oEDGUtilities;
   
   &oEDGUtilities = create EDG_UTILITIES:EDG_User_Utilities();
   
   /* Set the content type */
   %Response.SetContentType("text/html;");
   
   /* Send the response */
   %Response.Write(EncodeURL(&oEDGUtilities.LogOutURL()));
   
End-Function;

I have created an App Class EDG_User_Utilities which will provide the generated logout URL, we will see that code next, but for now when we get that logout URL I set the response to text/html and then do a %Response.Write with the encoded logout url. This is just like doing a return in a function except here we are returning the code from the server IScript to the Client JavaScript.

method LogOutURL
   /+ Returns String +/
   Local string &linkUrl = "";
   Local boolean &hasaccess;
   Local integer &pos1, &pos2, &pos3, &i;
   Local string &siteName, &char, &parseSiteName;
   
   &linkUrl = %Request.LogoutURL;
   
   /* Code taken from PTBR_BRANDING.SystemElements.SignOutLink */
   
   /* Remove session number (_nn) from the URL */
   
   &pos1 = (Find("/psp/", &linkUrl) + 5);
   &pos2 = Find("/", &linkUrl, &pos1);
   
   &siteName = Substring(&linkUrl, &pos1, &pos2 - &pos1);
   
   &pos3 = 0;
   For &i = 1 To Len(&siteName)
      &char = Substring(&siteName, &i, 1);
      If &char = "_" Then
         &pos3 = &i;
      End-If;
   End-For;
   
   
   If (&pos3 <> 0) Then
      &parseSiteName = Substring(&siteName, &pos3 + 1, Len(&siteName) - &pos3);
      If IsNumber(&parseSiteName) Then
         &siteName = Substring(&siteName, 1, &pos3 - 1);
      End-If;
   End-If;
   
   &linkUrl = Substring(&linkUrl, 0, &pos1 - 1) | &siteName | Substring(&linkUrl, &pos2, Len(&linkUrl) - (&pos2 - 1));
   
   Return &linkUrl;
   
end-method;

Above you can see my LogoutURL method taken from my EDG_User_Utilities Application Class. As you can see I took this code from the PeopleSoft delivered code PTBR_BRANDING.SystemElements.SignOutLink.

FINAL NOTE: Apologies I have not had chance to create a project with the objects in yet. When I experiment with these ideas I tend to code quite messy as I hit dead ends and have to try many approaches to get something working. The code for this logout is sat in a project that includes all the PeopleSoft Broadcast Component Code, as well as my EDGE toolbar and countless utilities that I have built to make life easier. To release such a large project, I worry will confuse people if I have not had time to explain my concepts. I will release the project in the future, it just needs a little cleaning first. The problem I have personally is I am very much an ever moving forwardperson, onto the next big idea and its a struggle to stop looking at new ideas to revisit old ideas. I’ll get there with the right amount of public pressure. ?All the best.

Categories
AE Action Plug-ins PeopleTools 8.59

8.59 Application Engine On Exit Action Plug-in

Following on from my piece on Application Engine Action Plug-ins we are going to look at the new functionality of 8.59 around the On-Exit Application Engine Plug-in. If you are not familiar with Application Engine Action Plug-ins then it might be worth going and visiting my previous blog as that is the exact subject that I covered. This new On-Exit feature allows you to now execute a plug-in step after the Application Engine has completed and also depending on the way that it completed. There are four different exit conditions that can be used as triggers: On Success, On Skip Step, On Break, On Abort. These exit conditions trigger based on the last Peoplecode or SQL action executed before the program exited. This in essence gives us a little more control than I initially thought as I simply thought this was to be a test of the Application Engine going to success or error.

So let us think about this, if the process runs successfully then the last step should be an On Success. This is where it took me a while to realise the difference between a normal step Action Plug-In and an On-exit Plug-in. You see the Action Plug-in is on a specific step, so we are saying if step ‘LAST’ runs then we put code after that and we know the process has completed, but what if you have a branching Application Engine that has multiple possible end states, then suddenly you would have to put Action Plug-ins on every final step, but with an On-exit Plug-in we can cover all end states with the one piece of code, which could be handy.

Where the new possibilities really open up are in the other states. If the last step was an On Abort then chances are you have some sort of error and so we could try capturing or even correcting the error, although the App Engine would still end. An On Skip Step state might be useful if you have logic in your interface that says if no file is in the directory then skip step. The On-exit Plug-in could capture this and choose to run a process that sends a request to the other system to resend the file.

For the first example I am simply going to recreate what I did in my last blog on App Engine Action P.Is. I am going to use the Build Search Index Application Engine PTSF_GENFEED and use the partition count on the run control page to break process into 16 smaller processes. This will create 16 run controls which we will then clean-up with our On-Exit plug-in.

We will re-use our little Action P.I App Engine that I created last time, re-usability – another great feature of Application Engine Action Plug-ins!

The first step contains our code to be used as the On-Exit Action P.I.

We will use the Step TIDY which contains the above code to delete those annoying run controls. Next, let’s navigate to Home > PeopleTools > Application Engine > AE Action Plugins. Choose the name of the Application Engine that we want to ‘Plug-in’ some new functionality, in our case PTSF_GENFEED.

You will see that there is this new section on the page now that allows you to enter one On-Exit condition. Why only one, I wonder? Maybe in the future you could have different code for On success compared to On Abort.

Now if we go to our App Designer and open up the Application Engine PTSF_GENFEED that we have just mapped to, we should see an On-Exit mapping indicator if we go to the Program Flow tab.

We are now ready to run the process which will create those 16 run controls, but after a few minutes that has gone down as some of the processes complete and remove their run control using the Action P.I. code.

And once again we have removed all those untidy run controls, but this time using the On-Exit Action P.I rather just the Action P.I.

For the second attempt we will switch the same PTSF_GENFEED Application Engine to use the step EDG_TIDY_AE.MAIN.TIDY2 this time on an abort event only. 

The step contains a single line of peoplecode to put out a message to the log so that I know this On-Exit plugin has been triggered.

To ensure we get an error I have added an error to one of the steps in PTSF_GENFEED. Once again we run the PTSF_GENFEED, but just a single instance this time.

And here is the resulting log file showing the ‘Added an error’ that I put to purposely break the App Engine and then further down we can see the message that I created using the Action P.I On Exit functionality. Brilliant!

Maybe I am being short-sighted but I am struggling to come up with many good ideas around this functionality. I think my problem is that my brain still sees this as what I originally thought the On-exit was, which was if the Application Engine ran to success do this or if it runs to error do that. I’m sure people will come up with great ideas, but we need time to tinker with it.

I can only really see how you could daisy chain a set of application engines and even create a decision tree using the On-exit plug-in, to take one path if an Application Engine runs to success or take another path and run a different set of processes if the Application engine Fails. Imagine you run your payroll and you have logic that says if the process fails then there is no point in running payslips and payroll to GL instead run your pre-payroll checks again to try to highlight any problems. This would be all very good, but I can’t help but feel that this concept would be better moved out of the Application Engine and into Schedule JobSets.

Wouldn’t it be great if you could create your batch to run over night and have it somewhat intelligently react to the processes that you run, so you don’t get that sinking feeling when you logon in the morning and say, ‘Oh the AP interface fell over so the whole batch stopped and we need to run the rest of the batch to catch up in the morning’. Your Schedule JobSet could have paths defined after each process. On successful completion of the ‘New_Starters’ interface for example, run the ‘Onboarding’ process, on error of the ‘New_Starters’  interface, request a new interface file.

Categories
AE Action Plug-ins PeopleTools 8.59

Application Engine Action Plug-ins

Although Action Plug-ins came in prior to 8.59 I still want to cover them. There is some new On-Exit functionality which I intend to cover at a later date. For now we are going to get up to speed with the basics.

Application Engine Action Plug-ins allow you to modify the way an Application Engine works without having to directly customise the code in that Application Engine. So what we are trying to say here is that Application Engine Action Plug-ins are Event Mapping for Application Engines. What do you mean, what is Event Mapping… quickly go read my previous blog!

So let’s address the burning question, ‘Why is it not called Application Engine Event Mapping rather than Action Plug-in?’. The name seems strange because we are mapping the new code just like in Event Mapping, I guess with an Application Engine we don’t have events we have steps and actions, so maybe Action Mapping would have been better name? For now I’m going to make it cooler by calling it ‘Action P.I’ (As a child of the 80s, I’m thinking of a certain 80’s series with Moustaches, a Ferrari 308 GTS and one Tom Selleck). But enough silliness about names, what can we do with this?

Well the good news is that, just like Event Mapping you can configure code to execute before or after a step or even instead of a step (override)., without having to customise delivered code.

Last year I had a requirement from a client to customise a delivered Application Engine. The delivered code could only deal with a single instance of data, but they wanted it to process multiple instances od data. I had to go through every one of the 100+ steps changing the code, making a big customisation… not good! Had they been on a version with Action P.I, things would have been much cleaner at upgrade time.

For my example of the Action-Plug-in I am going to use the Build Search Index Application Engine PTSF_GENFEED. If you have large Elastic Search Indexes to build then you can use the partition count on the run control page to break your large data into a number of smaller partitions. In this case I am going to break the HC_HR_PERSON search index build into 16 partitions.

When I hit the run button here, the code will create 16 new run controls that will be used to execute 16 Application Engines, each one processing one of the data partitions.

When those processes have run to success, if I go back to the run control search page I can see all those generated run controls… what a mess. So I am going to get the PTSF_GENFEED Application Engine to tidy up after itself with an Action P.I.

We start by creating our own custom Application Engine which needs only one step. This one here has two steps as the second step is for another time! The first step will contain our code to be used as the Action P.I.

We will use the Step TIDY which contains the following code to delete those annoying run controls. We navigate to PeopleTools > Application Engine > AE Action Plugin.

Here we map the custom code action TIDY to execute after the ES_STAT step01 runs in PTSF_GENFEED. And that is it done. Easy Create a custom App Engine Step and map it to the delivered App Engine. That’s even easier than 1, 2, 3, it’s just two steps!

Running the process creates 16 run controls, but after a few minutes that has gone down to 13 as some of the processes complete and remove their run control using the Action P.I. code.

A few more minutes and we are down to 7 run controls.

Finally all the run controls have gone. Look at that, an Application Engine that tidies up after itself. Now if only I could get my kids to do that!

P.S. Those that follow me on Linked In might have seen my post about the hero developer in Oracle that after 21 years has finally fixed the process definition search page so by default it is search by Process Name. I can remember this bugging me back in 2001 when I first started at PeopleSoft. It just goes to show that just because you have done something one way for a long time does not mean it is right! Well done to that champion who righted the wrong!

Categories
Event Mapping PeopleTools 8.59

8.59 Event Mapping Override

I’m a big fan of Event Mapping, I wasn’t always, but I am now. I’ll maybe tell you the story about that another time. I know some people are not really interested in what it has to offer and I think that is because people are not really looking at what can be done with it. I’ve got loads of cool stuff that I’ll get together into a presentation at some point and prove Event Mapping is the place to be.

Anyway, back on topic. Today I want to look at the 8.59 Event Mapping changes and in particular one of the big deals for me, the Event Override. Up until now you could only use Event Mapping to add on to delivered code, which is fine if you want to change a value, but not if you want to stop something from happening.

Say you have a component that adds people to a team and the delivered SavePostChange has code that when you successfully add a new member to the team it sends out an email to that person. Now you want to change this so that if the person added has a mobile number then rather than an email it sends a text. With the old Event Mapping you could only add code before or after, so the email would still get sent and after the event then you could send a text. That would be no good so you would have to directly customise the delivered code to stop the email and send the text. The situation changes with the birth of the Event map override, we can stop the delivered code running and put a copy of that code into the Event, add in our logic to make it select from email or text and we are good to go. This is a big deal as we have fundamentally changed the way a delivered component works without having to intrusively customise the code.

My Test Page

I know people will point out the maintenance issues, what happens when the delivered code is updated and my event map no longer has the correct code. This is a challenge that we have with any customisation, and make no mistake this is still a customisation, it just allows your ‘Stay Current’ upgrades to run a lot smoother. Also, I am sure Oracle could come up with a nice way to flag event map code that is linked to an object that changes in an upgrade. There’s something for you to work on Oracle, please (if you haven’t done it already!)!

The Post Build ‘Delivered’ Peoplecode

On to my little demonstration. I created a simple page with two fields on it, a textbox to display a string and a ‘Total’ field to display a number. I had the ‘Total’ field set to 6 at the start. Then I added Component Post Build code which will set the Text box to read ‘The colour is Red’ and it will add 4 to the value of ‘Total’ (which should be 6, giving 10).

The Event Map Code

Then I created my Application package by implementing PT_RCF:ServiceInterface, just like you would normally. In this code I want to set the Text box to read ‘The colour is Blue. We have overridden the POST BUILD’. Now this result could be achieved with a Post Event Map as all it has to do is after Post Build sets the text box just overwrite the value. This is why I introduced ‘Total’, which starts with a value of 6, but if Post Build fires will add 4 to become 10 and in my Event map code I add 10 to the ‘Total’. Because we are overriding the Post Build the result should be 6 + 10 = 16 and not 6 + 4 + 10 =20, this is because the 4 should not be added as the Post Build code will not run.

So that is my little test component and code done. An IMPORTANT new step to carry out is once you create a new component is, you need to ensure the entries are updated into the Elastic Search definition PTPORTALREGISTRY which is used when using the new Homepage search. So ensure you run an incremental build of that definition. otherwise you will not find your CREF later when configuring the Event Mapping.

So we have our App Designer project, what do we do next. Well, I always follow my Event Mapping mantra which is: ‘It’s as easy as 1,2,3’.

  1. Create an Application Package for your code.
  2. Create a Related Content Service.
  3. Map the Event.

Let’s create the Related Content Service. In 8.59 this is a little different to what we are used to. They have finally moved the Event Mapping piece away from that terribly confused Manage Related Content Service component. You can still create your related content service by going to Home > PeopleTools > Portal > Related Content Services > Define Related Content Services. Or you can go to Home > PeopleTools > Portal > Event Mapping > Event Mapping Configuration, we will look at this page as it is new to 8.59.

The New Event Mapping Service Creation

There are two tabs on the left, pick Event Mapping Services and you will be presented with a long list of the already created Service IDs. But we want to create a new one for our project so click on one of the + buttons on the right to add a row. Give your service an ID and name, then map the Application Class to it and PeopleSoft does the rest for you. You can go into the old Define Related Content Services page if you want to see your created service.

The New Event Mapping Configuration

Finally, we go to the Configure Event Mapping tab on the left and this show a list of the Event Maps. We want to create a new one click the ‘Add Configuration’ button. Note if it does not appear, you probably have not run the Elastic Search definition PTPORTALREGISTRY.

Setting The Event Map

So find your CREF and then choose the Event Level you are mapping to, in this case Component Post Build. Then add the Service ID that you just created and we want Override for the Sequence. Save and it is ready!

Navigation Helper

One last thing, when on the Configure Event Mapping page on the grid where your Content Reference is hit the little ‘Navigation’ chevron on the right and it pops up a box with the navigation.

The Result Of The ‘Delivered’ Component Post Build Code Running

We navigate to the component without the event map override in place and this is the result.

The Result When The Event Map Override Is Enabled

Now with the Event Map Override in place and the result we get is Red and 16. Result it works…

Welcome to a whole new world of less intrusive coding! And if you are not impressed with that, I’ve got some cool ideas that you can try with Event Mapping coming in the future.

Thanks for reading…

Categories
PeopleTools 8.59

PeopleTools 8.59 Homepage


PeopleTools 8.59.01 has arrived. Here at Version 1, I am lucky enough to have access to Oracle Cloud and PeopleSoft Cloud Manager which means we can get all the latest PeopleSoft releases as soon as they drop. I hope to share some of what I find when exploring this new version. So let’s start at the beginning with the first thing that hits you upon logging in. I’m going to look at the redesigned Fluid Homepage.

The very first thing that immediately stands out is the toning down of branding. Look at the subtle ‘O’ in the top left of the header bar, the only hint of what product this might be. It’s like someone at Oracle has been to Ikea and gone very minimalist, but do you know what, I like it.


Moving along the header we see the prominent Search bar that Oracle hinted at in their PeopleSoft Planned Features and Enhancement page some months ago. Interestingly the ‘Menu’ dropdown is in fact a content filter so you can search across the ‘menu’ or ‘content’ all from the one bar. That means I can find the Job Data component link and then in the same search bar I can find Job data for an employee.


Results appear as soon as you begin typing and refine on the fly as you type. The list of results are presented as a modal dropdown from the search box. It will be interesting to see how this performs, as I can remember issues with the type ahead on some implementations. However, it seemed pretty slick on this instance!


Finally. we make it to the right of the header bar where the Action Icons sit, but they have been reduced to only 3 on the home page, Home, Actions Menu and Nav Bar. This reduction in icons is mainly due to the redesign of the interface, we don’t need the looking glass Search as we have our centre stage Search bar and the notification bell isn’t there because they have moved notifications, but more on that later.


A tentative click on the Nav Bar icon brings up a much more slimline version of the navigation tool, clearly the Nav Bar has taken advantage of Lockdown to shed some pounds. We have some new minimalist icons for the important things, such as the Recently Visited and Favourites, as well as for the renamed Menu (no longer Navigator). I wonder if the rename of this is because the past menu structure did feel like you needed a map and compass to navigate it, whereas this new version is much more intuitive. We all took great pride in memorising where exactly PeopleTools was in the menu structure. Well no longer do we need to because the menu is now … alphabetical!


The alphabetical menu structure feels far more intuitive to users of all levels of experience, its as easy as ABC! This has been something that has bugged me for what seems like a lifetime, but I’m glad it has finally made it. Although for those that have invested to much time in the classic jumbled menu you can switch back to that.


And it gets better. Drill down through the menu and at the top you can welcome back an old friend… Breadcrumbs are back and like the Google Maps of PeopleSoft they are here to rescue you from getting lost.


Moving away from the header and onto the homepage itself, the icons look unchanged. I think that was the right move, there was nothing broken there the icons are crisp and clean. What is new though, is down the left of the screen we have a new menu bar, that reminds me of the Samsung Galaxy Edge bar. It only has a couple of icons for Recently Visited and Favourites but is a good way to make use of that excess space you have on a landscape form computer rather than cluttering the top. At the moment it looks as though you only get these two icons which looks a little lonely. I wonder if it would have been slicker having this as a favourites bar with your favourites directly on show, I know it would only save one click, but having a huge bar and clicking on one of 2 icons to then bring up a larger list just seems wasteful, but then I’ll argue that it probably looks better on mobile devices, so I will shut up.


Jumping over to the right side of the homepage we have the newly re-homed Notifications area. My first thought is that those notifications are getting quite a lot of real estate on the page. I would have preferred them as just a popup even on the Homepage. The problem I have with notifications are that they need to be thoughtfully balanced to be of use. If you get too many useless notifications then you just ignore them and I can easily see this Notification frame becoming like the Worklist of yesteryear with hundreds of ‘spam’ notifications which just get ignored.


It’s a shame that some of the changes to the homepage do not continue as you navigate to components, for the prominent Search bar disappears and is no longer available when I navigate to a component, be it Fluid or Classic+. The Action Icon Bar returns to its familiar 5 icons (notifications and search icons) as the Notification pane disappears as soon as you navigate away from the homepage. It would be quite nice to have had these stay as part of a consistent UI, but I’m sure this will be coming in the future.


Overall though I have to say I like the changes to the UI. The look is cleaner, more focused. The functionality is more intuitive and user friendly, navigation feels like it is slicker. Will it make your day to day job any better? With the return of our beloved Breadcrumbs, you have to say yes!

Categories
PeopleTools 8.59

PeopleTools 8.59.01 Released

The much anticipated PeopleTools 8.59.01 has arrived. I have been taking a look at it and over the next few weeks I will post some of my findings.